
“Today’s classrooms are not taught with “one-size-fits-all” teaching. Differentiated instruction—and learning stations specifically—allows you to meet the needs of all learners while maintaining high standards within groups or individually. When you match a variety of exciting activities to a student’s learning style and preference, then magic happens.”
– Janelle Cox
Now that we have established a framework for getting started with literacy centers, let’s focus on how to maximize their effectiveness in our classrooms! Literacy centers are a part of our day where we have the potential to provide truly differentiated instruction to our students. Since students are going to be working in small groups anyways, it is an ideal time to tailor our activities to suit their needs and learning styles.
Now, I admit this sounds great…but also a bit overwhelming. I had some questions when I first started:
If these questions sound familiar to you, don’t worry. There are some simple guidelines and suggestions that will lead you through setting up your groups, organizing your center rotation, and keeping materials in order. You honestly can set up dynamic and effective differentiated centers without getting buried in piles of data and materials!
Here are the steps that got me started:
I know-this is not what any teacher wants to hear! Who wants to spend more time collecting data? Don’t worry. Chances are, you already have the data you need to create differentiated groups. The information you get from district-wide assessments (such as Acadience or aimswebPlus) can be very useful, especially when paired with running records and classroom evaluations.
Once you have determined what data you are going to use, you are ready to create your initial groups. Now, we all know that no data is perfect so you may want to adjust your groups throughout the year. Recognizing this from the start takes a bit of pressure off to form “perfect” groups of students you truly don’t know at the beginning of the year. I will discuss this a bit more later on. To get started, though, use the data you have and trust your instincts.
Once you have your data, it will probably look something like this:
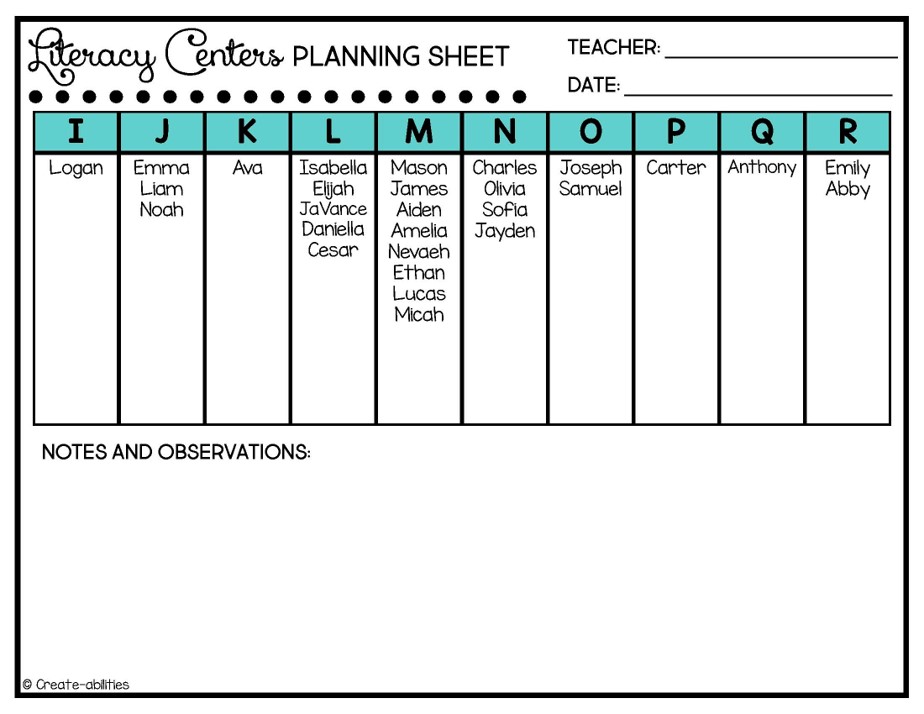
You can see in this example that some students are reading in the lower levels (I, J, K) and some that are already at Q and R. This is a wide range of abilities, but it is a pretty typical distribution.
At this point, you should have determined how many centers you are planning to have (if not refer to this post for some tips). That is the number of groups you will need. So now you just use your data to create groups of students that are working at roughly the same level. In order for you centers to run well and for you to maximize your guided reading instruction, it is essential to have students of similar abilities in each group.
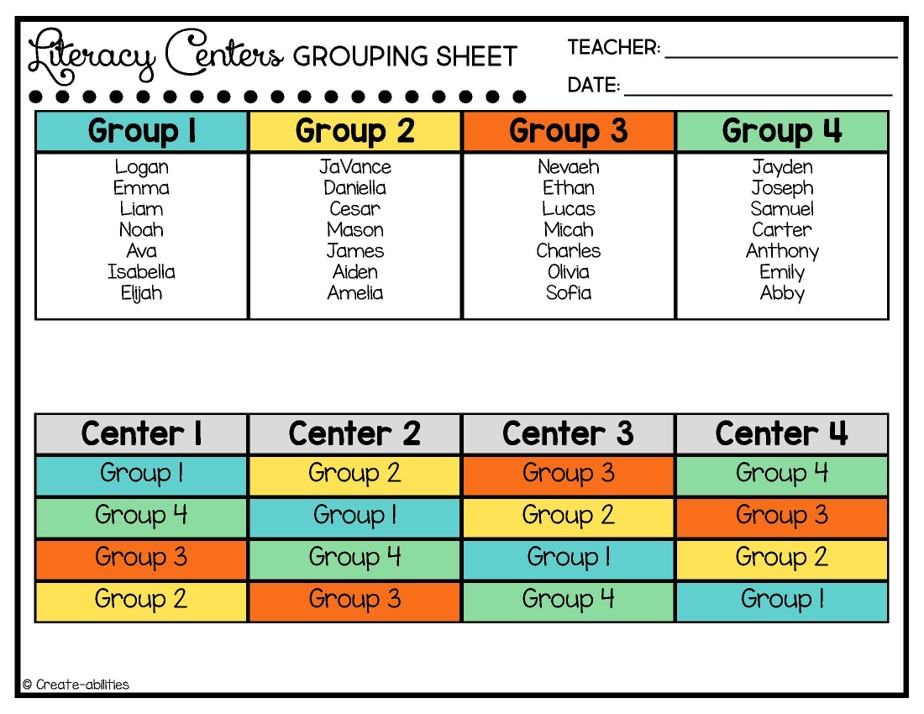
At times, this might mean that your middle groups are slightly larger since this is typically where the largest proportion of our students are performing. Although it is easier for management purposes to keep your groups about the same size, it is more important to consider abilities than simply size when forming your groups.
As you can see from the figure above, I color-code my groups after I’ve set them up. While the specific colors you use do not matter, I recommend avoiding standardized colors of leveling (such as red, yellow, and green from Acadience). Kids pick up on these nuances more than we realize, and the negative connotations that come from being in a “lower” group can be damaging. There are many colors, so choose the ones that you like best! Having this color coded system helps with management, planning, and organization.
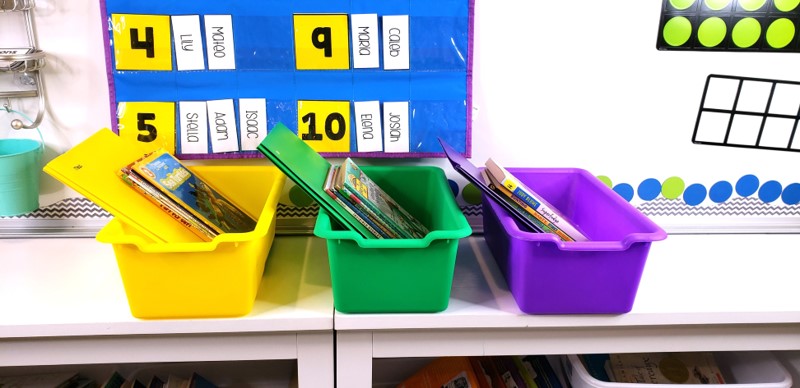
One option for this display is a basic pocket chart.
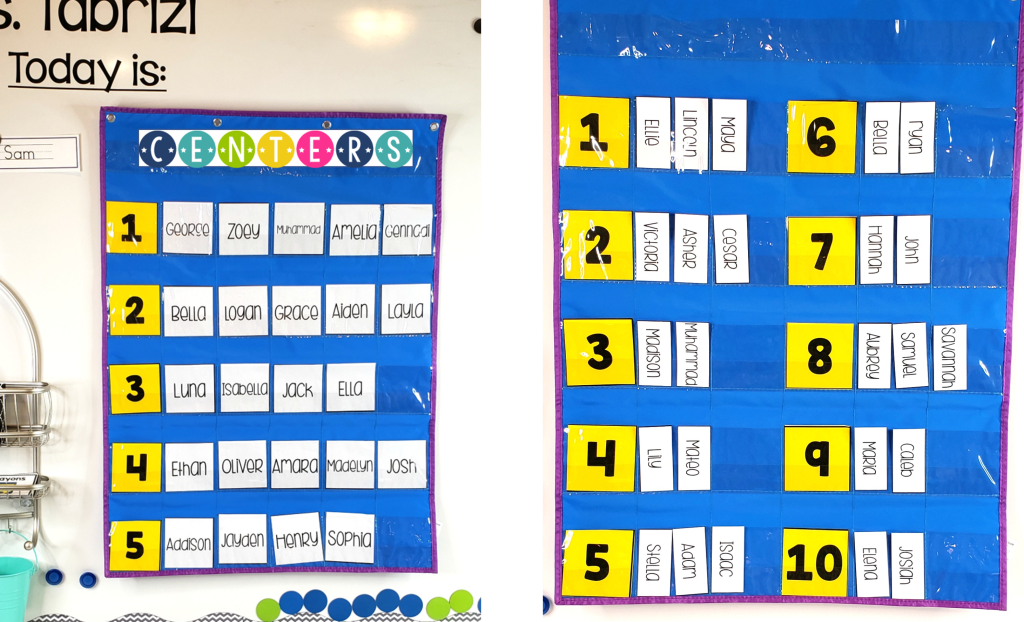
I am a die-hard fan of pocket charts, and this was my go-to for many years! As you can see in the examples (one has 5 groups, and the other has 10), you place the nametags in the chart, and then rotate the numbers when the timer goes off. Students can look up at the chart if they are unsure where to go next, eliminating their need to ask you!
Recently, I have switched to use a PowerPoint presentation projected onto my SmartBoard.
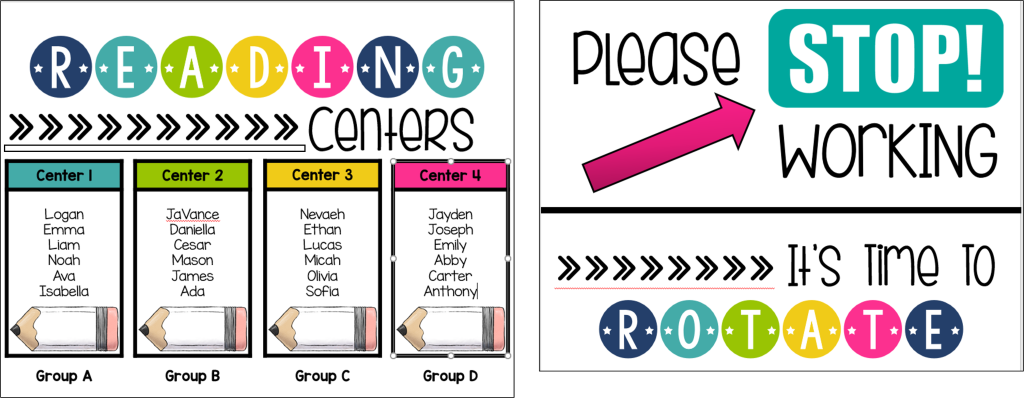
As in the example, the first slide shows students where they need to be by listing each color coded group. When the timer goes off, I simply flip to the next slide that instructs them to rotate. After rotation time is over, the next slide will show them where they should be for the next rotation. This is great because it is easily edited to adjust groups, and is always ready to go!
For example, look at this Reading Response center. Each bin aligns with each group’s color, and has leveled texts that directly meet the needs of that group. Then, inside the folder are the specific papers that go with those books. This is a great way to tailor your tasks to meet the needs of each group without direct teacher instruction. It is also a great time saver when I am planning my activities for each group, since the containers stay put every week. I just swap out the materials, and am ready to go!
As I mentioned earlier, we all know that there is no perfect way to gather data. I have found my system works well, but it certainly isn’t foolproof. This is why it is important to be reflective as you move forward with both your literacy centers and guided reading. Your groups should be thought of as fluid, because they will likely change a few times throughout the year.
Literacy centers will be happening while you are conducting guided reading groups. That guided reading time is when you will get invaluable information about your students’ reading progress. You will hear each student read and monitor their comprehension, so you may realize that your initial data does not match a specific student’s performance. Use this information to adjust your groups as needed. I have had students that needed more support than I expected, and also had students excel beyond the capabilities of the rest of their group. This information allows me to move those students into groups that will better match their needs, and therefore give them more appropriate instruction. Do not be afraid to change your groups as you go. Ultimately, it is up to you to determine each student’s capabilities and to place them in the appropriate group as you go.
The most powerful thing about literacy centers is the way they can be easily differentiated to meet the levels of each and every one of your students. By creating appropriate groups and differentiating tasks, you will be maximizing every minute of your literacy instruction. So while the data collection can seem challenging, it truly pays dividends as you watch your students become more independent readers and writers.
If you are interested in more information about literacy centers, you might want to check out the Create-abilities Literacy Centers Webinar that has a wealth of information and an eBook full of resources.
Do you differentiate your literacy groups? What tools do you use to set up your groups, and to keep them organized in your classroom?